By Emily Bennett | Updated: Dec 12, 2025
Editor’s Note: This guide has been updated to reflect the latest interface changes in both the Coinbase and Tangem(Links may be affiliate links) apps. Please note: Coinbase’s network fees fluctuate based on blockchain congestion. Always double-check the network selection icon before hitting send—this is the #1 cause of lost funds we see in our community.
So, you finally bought a Tangem Wallet. Congratulations! You have taken the biggest step toward true ownership. But now comes the scary part: moving your funds.
I hear this from our community every day: “Emily, I’m terrified I’m going to send my crypto to the wrong address and lose it forever.”
I get it. The first time you move crypto from a centralized exchange like Coinbase to your own cold wallet, it feels like walking a tightrope without a net.
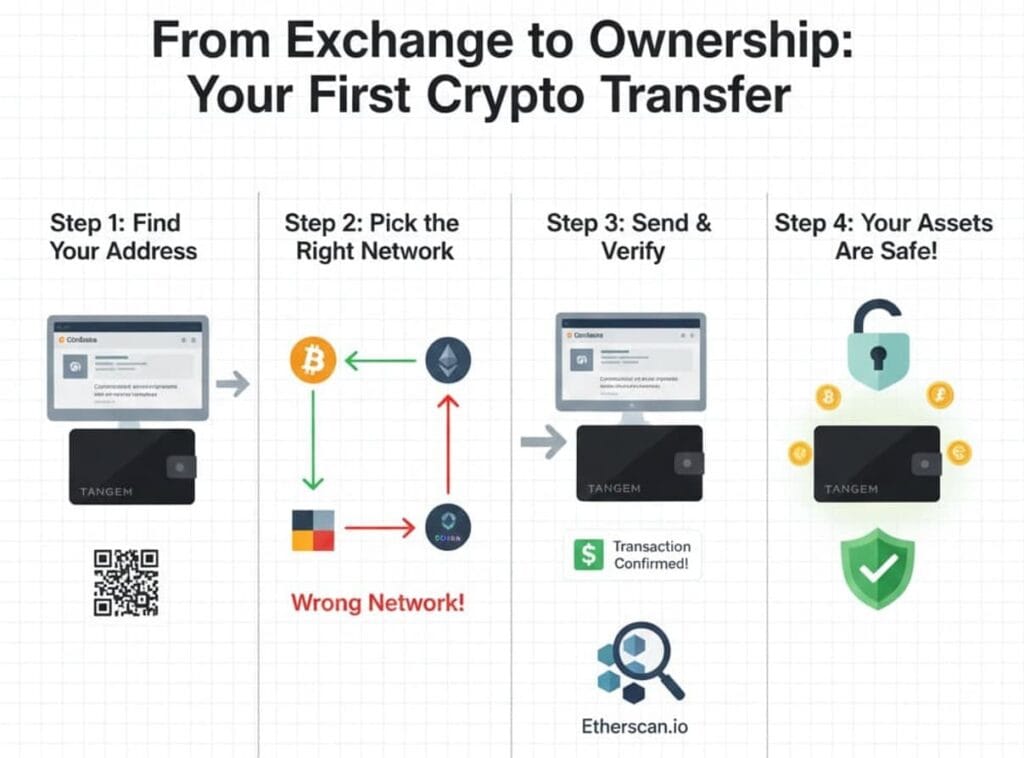
In this guide, I’m going to hold your hand through the entire process. We will cover how to find your address, how to pick the right network (this is where most people mess up), and how to verify your transaction.
Let’s get your assets safe.
Before We Start: The “Golden Rule” of Transfers
If you only remember one thing from this article, let it be this:
The Network Must Match.
If you send a token on the Ethereum network to a wallet address that is expecting it on the Polygon network, your money will disappear. Always double-check that the network icon in your Tangem App matches the network you select on Coinbase.
Quick Reference: Fees & Time
Wondering how long this takes? Here is a cheat sheet for the most common transfers.
| Asset | Network Selection | Est. Network Fee | Time to Arrive |
|---|---|---|---|
| Bitcoin | Bitcoin | ~$2 – $10 | 30-60 mins |
| Ethereum | Ethereum (ERC-20) | ~$3 – $15 | 5-10 mins |
| USDC / USDT | Ethereum (ERC-20) | ~$5 – $20 | 5-10 mins |
| Solana | Solana | < $0.01 | Seconds |
(Note: Coinbase may charge a small withdrawal fee on top of the network cost.)
Step 1: Set Up Your Tangem Wallet (If You Haven’t)
I’m assuming you have already activated your cards. If not, open the Tangem App, tap “Scan Card,” and follow the prompts to create your wallet.
Once your cards are backed up, you will see the main screen with a list of default cryptocurrencies.
- Don’t see your token? Scroll down to “Manage tokens” and search for it. For example, if you bought PEPE on Coinbase, you need to enable the PEPE token in Tangem first.
Don’t have a Tangem wallet yet? Use code BEGINNER for 10% off at checkout.
Step 2: Get Your Receiving Address (The Destination)
This is where your crypto is going.
- Open the Tangem App.
- Tap on the specific coin you want to receive (e.g., Bitcoin).
- Tap the “Receive” button.
- STOP and Look: You will see a QR code and a long string of characters. You will also see the network name (e.g., “Bitcoin” or “Ethereum”).
- Tap “Copy Address.”
Emily’s Tip: Never try to type this address by hand. One wrong character and the funds are gone. Always use the “Copy” button.
Step 3: Initiate the Withdrawal on Coinbase
Now, let’s go to where your money currently lives.
- Open the Coinbase app.
- Tap “My Assets” and select the crypto you want to send.
- Tap the “Send” (arrow) icon.
- Enter Amount: I highly recommend sending a test transaction first. Send $10 worth of crypto just to be safe.
- Paste Address: Paste the address you copied from Tangem into the “To” field.
“Think of the $5 network fee as insurance. Would you rather lose $5 on a test, or lose your entire life savings on a mistake? Just do it.”
Step 4: The Critical Check (Network Selection)
This is the moment of truth. Coinbase will usually detect the network automatically based on the address, but not always.
- If you are sending Bitcoin, ensure the network says “Bitcoin”.
- If you are sending Ethereum or ERC-20 tokens (like SHIB or UNI), ensure it says “Ethereum”.
- If you are sending USDC, be careful! Coinbase supports USDC on multiple networks (Base, Solana, Polygon, Ethereum). You must select the exact same network that your Tangem address was generated for.
Warning for XRP & XLM Users:
If you are moving XRP or Stellar, Coinbase might ask for a “Destination Tag” or “Memo.”
- For Tangem: You usually do not need a memo when sending to a private crypto wallet like Tangem.
- Note: When sending TO Tangem, you usually do not need a Memo/Tag because you are the sole owner of the address. If Coinbase asks for one but Tangem doesn’t show one, you can safely skip it (or enter ‘0’ if Coinbase forces you).
Stuck? If Coinbase says you can’t withdraw yet, check if you have “Allowlisting” turned on. If you do, you’ll need to add your Tangem address and wait 48 hours for security clearance.
Step 5: Send and Verify
- Review the details one last time. Address? Check. Network? Check.
- Tap “Send now” and enter your 2FA code to confirm the transaction.
- Wait.
This is the part where your heart rate spikes. It’s normal!
- Bitcoin is slow. It can take 30 to 60 minutes. Don’t panic if it doesn’t show up instantly.
- Ethereum usually takes about 5 minutes.
You can track the progress by clicking the transaction within Coinbase. Once it says “Completed,” open your Tangem App and pull down to refresh.
Did the $10 arrive?
Yes? Fantastic! You have successfully established a secure link between the exchange and your wallet. Now you can repeat the process to send funds for the remaining balance.
Common Questions I Get Asked
Why does Tangem show a different price than Coinbase?
Crypto prices vary slightly between different data providers. Tangem pulls price data from CoinGecko, while Coinbase has its own market price. The amount of tokens (e.g., 0.5 BTC) should be exactly the same.
Can I swap my crypto once it is in Tangem?
Yes! The Tangem App has a built-in swap feature. However, swapping inside a cold wallet usually has slightly higher fees than trading on an exchange. I recommend using Tangem primarily for holding (HODL), not day trading.
What if I lose my phone?
Your funds are not on your phone; they are on the blockchain. As long as you have your physical Tangem cards, you can just download the app on a new phone, scan your card, and your wallet will reappear instantly. Your private key is safely inside the card, not the device.
Note: You can turn on Biometrics (FaceID) in the Tangem settings. This lets you check your balance without scanning the card every time, but you’ll still need the card to send funds.
Final Thoughts from Emily
You did it! Your assets are now offline, secured by a military-grade chip, and fully under your control.
Moving cryptocurrency off an exchange is the best way to protect yourself from platform bankruptcies and hacks. It feels a bit technical the first time, but once you’ve done it, it becomes second nature.
Welcome to self-custody. It’s nice here.